Getting Started with Node.js: Part 4
Welcome to Part 4 of Getting Started with Node.js. In Part 1, we installed Node.js and ran our "hello world" file through the command console. Node.js becomes really awesome when we can use it as a web server to serve web pages, so in Part 2 we took the same file and set up a Node.js server, and ran the file in the browser.
In Part 3 we moved the content of our "page" to an HTML file so you can get away from putting your HTML in JavaScript strings. In this section we are going to add a form to our HTML, submit it to our server, and accept the information on the new page.
If you haven't done so already, please read Part 1, Part 2 and Part 3 before continuing. I will assume you have, so you are on your own if you skip them and don't understand something.
We are going to expand on the code we wrote last time in Part 3. Please use the same folder. We will be switching back and forth between two files, server.js and homePage.html. If you just finished Part 3, everything should still be in the same place, otherwise, run a sanity check by navigating to the directory in the terminal and running:
node server.js
Visit the site (http://localhost:3000), Node will be listening and you should see the HTML page. Go back to the terminal and close your Node program (control-c). Go to the HTML file. Let's add in Bootstrap so we don't have write a lot of CSS. You can fetch the newest version from getbootstrap.com or use my tag below (Beware! If you use v4 of bootstrap your form may look totally different!).
<link rel="stylesheet" href="https://maxcdn.bootstrapcdn.com/bootstrap/3.3.7/css/bootstrap.min.css">
Put this right before the closing head tag. Now let's add some HTML to our form. I'm going to use the base layout that Bootstrap supports. This is my entire HTML file:
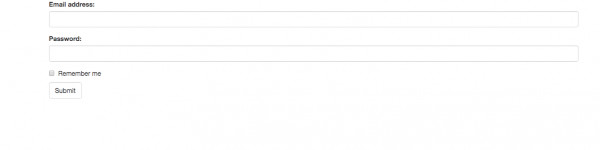
<html>
<head>
<title></title>
<link rel="stylesheet" href="https://maxcdn.bootstrapcdn.com/bootstrap/3.3.7/css/bootstrap.min.css">
</head>
<body>
<div class="container">
<form>
<div class="form-group">
<label for="email">Email address:</label>
<input type="email" name="email" class="form-control" id="email">
</div>
<div class="form-group">
<label for="pwd">Password:</label>
<input type="password" name="password" class="form-control" id="pwd">
</div>
<div class="checkbox">
<label><input type="checkbox"> Remember me</label>
</div>
<button type="submit" class="btn btn-default">Submit</button>
</form>
</div>
</body>
</html>
Restart your server (ctl-c to stop, then "node server.js" again to start) and load the page. Make sure everything is up and running. The page should look like this:
We need to add a few things to our HTML to make it submit the form. You can check out the documentation here, but a form tag has an "action" and "method" attribute. The action tells the form where to send the information it has, in this case, it's to our Node server. The method tells the form what type of HTTP request to make. We are going to use "post", which is the most common type. Change your form tag like so:
<form action="/form-submit" method="post">
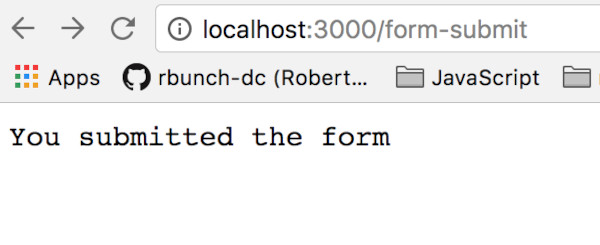
Reload your server again and refresh the page at http://localhost:3000. When you click on the submit button, the content of the page won't change at all, but the URL does. It changes to /form-submit. Why? Because you told the form action to submit to that page! Now, we need to tell Node what to do when it gets here. Let's go back over the server.js file. We are going to need to set up a basic if statement in JavaScript to handle our different pages. If someone comes to the URL (localhost:3000) looking for /form-submit, we want to do something specific. If they come to any other URL, just load up the form. We can get the URL the user requested out of the request object in our function. It is at request.url. I'm going to throw in a dummy response.end() so we can make sure the code is running. The whole server.js file looks like this with the new if statement:
var http = require('http');
var fs = require('fs');
http.createServer(function (request, response) {
if(request.url == '/form-submit'){
response.end('You submitted the form');
}else{
response.writeHead(200,{'content-type':'text/html'});
var theHomePageHTML = fs.readFileSync('homePage.html');
response.write(theHomePageHTML);
response.end();
}).listen(3000);
console.log("Server is listening for HTTP traffic at port 3000...");
We haven't changed the way any page works EXCEPT for /form-submit. If you restart the server (again, do a ctl-c followed by "node server.js") and refresh the page, you will get something different when you submit the form. It's may not look like much, but you have made your own router!
Now we get to some nitty gritty. When the form submits it sends everything inside the form tags that has a name attribute (input, textarea, etc.). That is the variable name and its value will be whatever was in the element. But Node doesn't get a string or text from the submission, it gets a "stream" of data. The data comes in small pieces that Node needs to reassemble into bigger pieces to make the string we want to use. To pull this off, we need to add an event listener (the thing that makes JavaScript so great!) that is built into Node.js. The "data" event will trigger a function everytime new data comes in. Each piece of data is typically called a "chunk" so we are going to write out a listener that adds them to an array. Our if statement should look like this now:
if(request.url == '/form-submit'){
var chunks = [];
request.on('data', function (chunk){ chunks.push(chunk); }); }
The first line is checking to see if the browser is at the submission page. If it is, then set up an empty array called "chunks." Then, start listening to request for any data that might come in. Any time data comes in, run a function that pushes the "chunk" of data onto the array "chunks." This is great, but it's not enough. We need something to happened when all the data is finished. There happens to be another event for this. Instead of on('data') we can do on('end'). This will call a function when the request has finished (i.e., all data has been sent). Let's add this right after our last event:
request.on('end', function(){
var data = Buffer.concat(chunks);
var dataAsString = data.toString('utf8');
response.end(dataAsString)
})
This function is a big one. Again, it runs once the request has finished its work, which means chunks is a complete array. You can put a console.log(chunks) in and check the terminal on load, but it's not useful information to us! It's in binary format and we need to convert it to English so we can use it. Node has a "Buffer" object that does just this. The concat method on "Buffer" will go through an array of "chunks" and slap them together into a single element that can be converted. We run that method on our array, store it in the var "data", then convert it using the toString method (this is part of all JavaScript). I specified utf-8 as the encoding to use and then store it in a var called "dataAsString."
Now it's simply a matter of using JavaScript to format what we have. The data comes through encoded. In other words, a space is not a valid character in a url so it's converted to %20. I want to get rid of those because the user didn't enter them.decodeURIComponent is the method for this. Then I'm going to use split to create an array on the &, then split each of those on the =. The result is an array that contains the data they used (check out W3's docs on split if you aren't familiar with it). At the end, my server.js file looks like this:
var http = require('http');
var fs = require('fs');
http.createServer(function (request, response) {
if(request.url == '/form-submit'){
var chunks = [];
request.on('data', function (chunk){
chunks.push(chunk);
});
request.on('end', function(){
var data = Buffer.concat(chunks);
var dataAsString = data.toString('utf8');
var formattedData = decodeURIComponent(dataAsString);
var dataAsArray = formattedData.split('&');
var finalData = [
dataAsArray[0].split('='),
dataAsArray[1].split('=')
]
response.end('Your '+finalData[0][0]+' is ' +finalData[0][1] + ' and your '+finalData[1][0] + ' is ' + finalData[1][1]);
});
}else{
response.writeHead(200,{'content-type':'text/html'});
var theHomePageHTML = fs.readFileSync('homePage.html');
response.write(theHomePageHTML);
response.end();
}
}).listen(3000);
console.log("Server is listening for HTTP traffic at port 3000...");
Remember, if you run into trouble, make sure to restart the server via the terminal and use it to look for errors. If you made it this far, you've done some pretty impressive Node! Stay tuned for the next installment in our How To's.
Interested in learning more about Node.js? It's just one of the many programming languages and frameworks we cover in our Full Stack Immersive program. Click the button below to download a course packet to find out more about our programs and curriculum!
Download Catalog
DigitalCrafts is part of the American InterContinental University System. Not all programs are available to residents of all states. See the Accreditation and Licensure section for information on the agencies that approve and regulate the school's programs.
View complaint information
Atlanta: 500 Embassy Row, 6600 Peachtree Dunwoody Road, Atlanta, GA 30328
Online: 2200 East Germann Road, Suite 100 · Chandler, AZ 85286